You don’t need to think long to name the easiest and most “budget-friendly” way to create a website with Elementor.
You can be anyone – an average newbie in development or a pro developer searching for quick web solutions – yet, benefit from a ready-made theme.
A WordPress-based multipurpose theme is the most universal option, which is considered a 100% safe bet for everyone regardless of the website’s purpose.
Originally created for blogging, WordPress has since grown into the world’s #1 content management system ever. Currently, WordPress has no limitations in terms of functionality and design – whether you choose one of many WYSIWYG (what you see is what you get) options, or decide to work with its code.
When it comes to WP page builders, all credits go to Elementor. This page builder combines multiple visual widgets & advanced CSS options and hosts hundreds of themes.
One of those that may be proudly recommended is Gutenix.
What is Gutenix for Elementor?
Gutenix is a multipurpose starter theme that works with 3 most-common WordPress page builders: Gutenberg, Brizzy, and finally, our one-and-only Elementor. For each of them, Gutenix prepared a special set of highly-editable theme designs, in particular, 15 starter website templates for Elementor.
Because the theme is compatible with ALL Elementor-based plugins, you may always supplement Getenix with extra addons, such as Stratum 20+ free advanced Elementor widgets.
Main Features of Gutenix:
- Multipurpose
- Lightweight and fast
- Preview Customizer (650+ fonts & unlimited color and design)
- Compatible with all Elementor plugins
- SEO-friendly
- WooCommerce-ready
- Retina and translation-ready
Gutenix has no demo version but you start test up the free version first and switch to the premium Gutenix plan later.
What Else Do I Need to Build a WordPress Website?
Overall, the process of building a separate WordPress website consists of many more steps than just downloading and setting up a ready-made theme.
In this guide, we’ll skip on several basic steps to focus more on editing our Gutenix theme.
Hopefully, you already:
- Know the idea and a topic of your website;
- Decided on the website focus on and defined the purpose (getting revenue, building your personal brand, or simply a hobby);
- Identified the target audience;
- Came up with the website name (or at least, have several to choose from).
Now when you have the fundamental pieces of your future website, you can start the action. These are 4 basic steps you must take care of to create a website with Elementor:
- HOSTING & DOMAIN
- WORDPRESS INSTALLATION
- THEME & PLUGINS (Gutenix, Elementor, and more)
- WORDPRESS SETTINGS
Now let me put it as simple and clear as I can with this step-by-step guide (with screenshots).
P.S. if you came for the Gutenix theme only, do not hesitate to skip the first two steps and move straight to the third one.
Building an Elementor & Gutenix Website in 4 Steps
Step 1. HOSTING & DOMAIN
So, you decided on the topic of your website. It can be an online store, a simple blog, or basically anything.
What comes next?
Apparently, you don’t start with editing your WordPress theme right away. To create a website with Elementor, first of all, you deal with the hosting and a domain name.
When choosing the best hosting company, consider the following:
- The website needs – namely, the number of resources, and the website possible scalability for the next 12 months;
- Uptime – it is important to keep your website consistent 24/7/365. Make sure it’s guaranteed by the provider;
- Support service – in case of the website downtime (it happens), fast support is worth its weight in gold;
- Easy to use – most likely, you don’t have time to tackle with complex control panels, so make sure the one of your potential hosting company is user-friendly and easy to navigate;
- Affordability – the cost of hosting matters for many users with limited budgets. You don’t want to pay money for hosting that doesn’t meet your needs.
Many hosting providers would also offer a domain registration service, and oftentimes, it’s offered for free (for one year). The only “job” left for you is to come up with a domain name and to make sure it’s available.
Alternatively, you can register a name on other registrars, but then you’ll have to bind your hosting and a domain manually (registering the DNS server addresses in the settings). Registrars usually send instructions to your email right after you complete payment. Purchasing a domain name requires providing your personal data to verify the domain ownership rights.
A few rules on choosing the right domain name:
- The domain name represents your brand and is the first thing your visitors should pay attention to. Make sure it conveys the key idea of your website.
- The shorter the name – the easier it is to remember and reproduce.
- The domain name shouldn’t have a second meaning or an unpleasant sound.
- The choice of your domain zone depends on the audience you want to see on your future website. The most common zones are territorial; yet, in many times, it’s logical to choose the thematic domains like .shop for an online store.
Step 2. WORDPRESS INSTALLATION
The first thing you need to create a website with Elementor is the installation of WordPress. You may complete this step in 2 major ways:
One way is when other hosting companies provide automatic installation of the software. If you choose a hosting plan with the automatic WordPress installation, the system will be immediately ready-to-use.
Another way is when you purchase hosting without the installed engine and then complete the following:
- Go to the official WordPress.org website and download the latest version of the software.
- After the download is complete, unpack the archive on your computer.
- Upload the extracted files to your hosting using one of the FTP clients (for example, FileZilla) to the public_html folder or to the root directory of your domain.
- After the upload, create a database. Go to the MySQL databases section on your hosting control panel and click “Create database“. Think of a database name and a password – you’ll need them in further steps.
- Now link the database with the files uploaded to the hosting. The database stores all site settings, posts, pages, and other data.
- To connect the storage location of our future posts with the site skeleton, specify the database name, username, and password in the wp-config.php file (the same data as for your database).
- Write down the website name in the browser’s address bar, and it will automatically transfer you to the my-site.ru/wp-admin/install.php installation page. There you’ll need to specify the remaining settings, such as the site name, login + password, and the admin’s e-mail.
Voila, WordPress installation is complete!
Now let’s move on to the most exciting part of our guide and work with the Gutenix theme in Elementor.
Step 3. THEME & PLUGINS
A good theme is a fundamental basis for the website of any kind and scalability, so you decide if this base will be solid and reliable. Although all WordPress themes and templates are interchangeable, you don’t want to waste precious time on poorly-designed solutions with messy code.
My experience with WordPress sites highly depended on the choice of a theme. Choosing a highly-functional and easily customizable theme from a reliable developer guaranteed a smooth hassle-free editing experience.
Most of the time, it was a premium solution like Gutenix.
3.1 Installation of Gutenix
Installation of Gutenix starts a little different from what you are used to doing earlier (if you did). Most likely, your templates came from the Appearance tab ➝ Themes ➝ Add New on your WP dashboard.
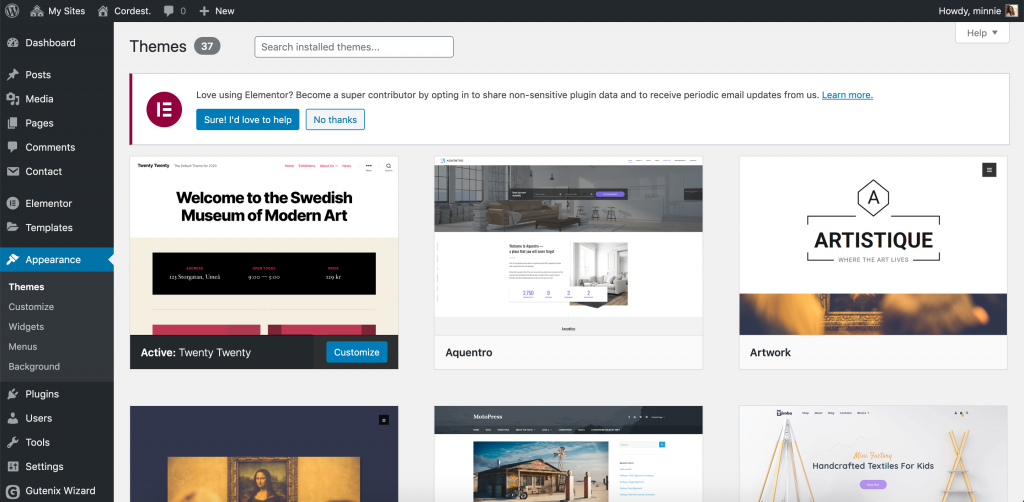
Gutenix installation starts a bit differently.
First of all, you go to the gutenix.com and purchase Gutenix.
You will get access to the personal account with all the needed data on the subscription plan, available updates, and the tab for creating a ticket in case of any issues. Also, a personal account has the Sections tab where you can download Gutenix Wizard from the Easy Installation section.
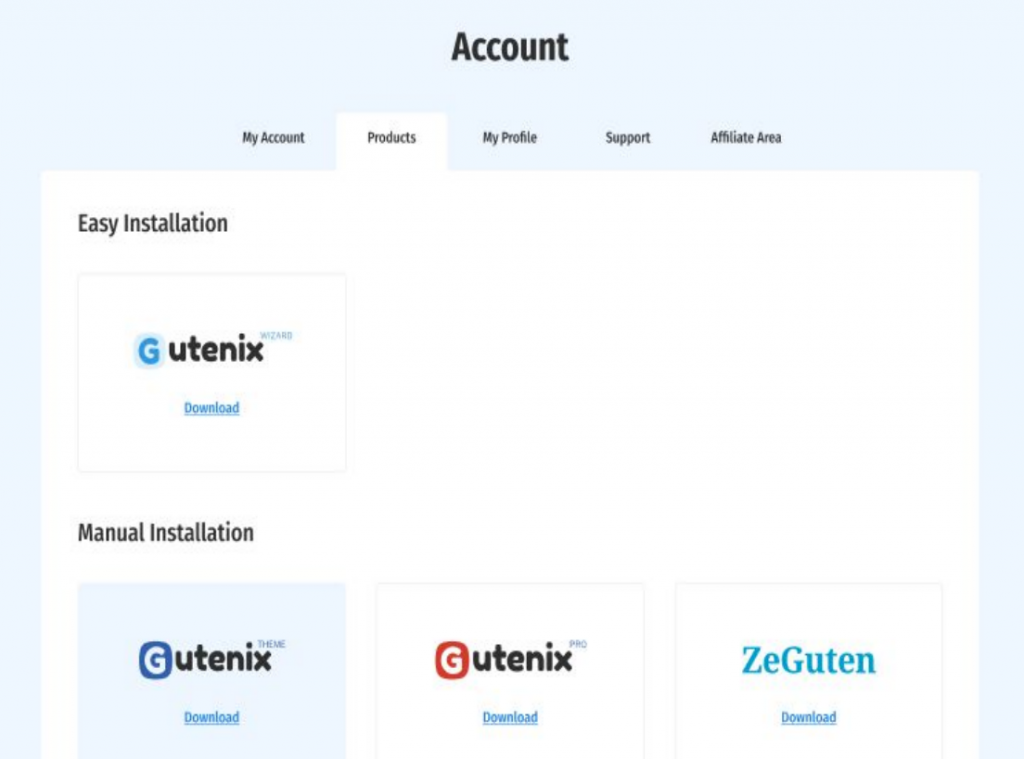
P.S. Gutenix is a package of products (not just a single template), and Gutenix Wizard helps you upload all of them in one click. Nonetheless, you can upload each product manually. To everyone’s convenience, Wizard works both with the free and premium versions of Gutenix.
Now when you downloaded the gutenix-wizard.zip file, go Plugins ➝ Add new ➝ Upload plugin tab in the WordPress admin panel, and press Install now. You will be redirected to the Gutenix Installation Wizard interface.
The Welcome tab gives you a choice between a free Gutenix version (with limited functionality) and the premium one (requires the PRO license key):
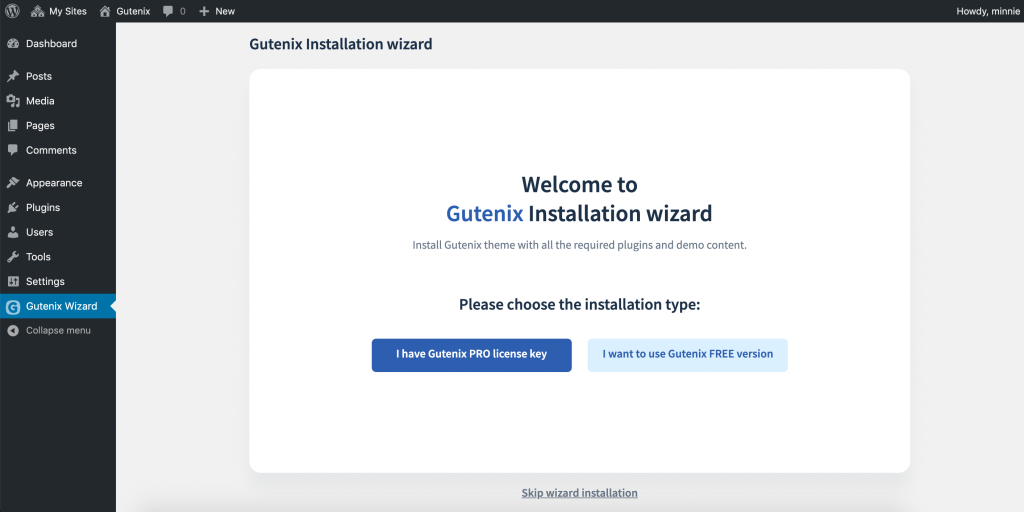
After you validate the key (you will find one in your account), the Wizard redirects you to the Theme installation tab. You have a choice of installing a child theme, which is a highly recommended step in order to keep the data safe during future updates:
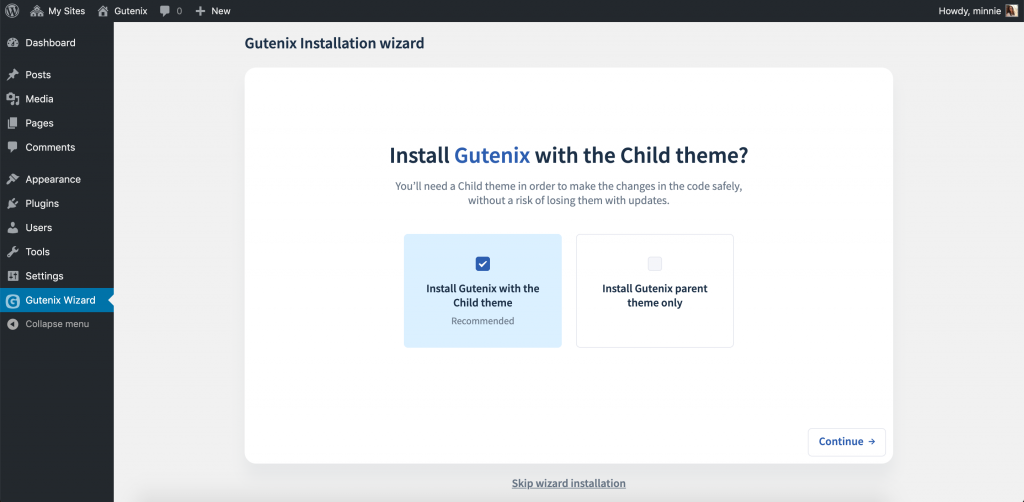
Wait until both themes complete their installation process (does not take long), and you will see the tab with pre-designed sites. Because you came here for the Elementor themes, you need to choose this page builder and one of its offered designs:
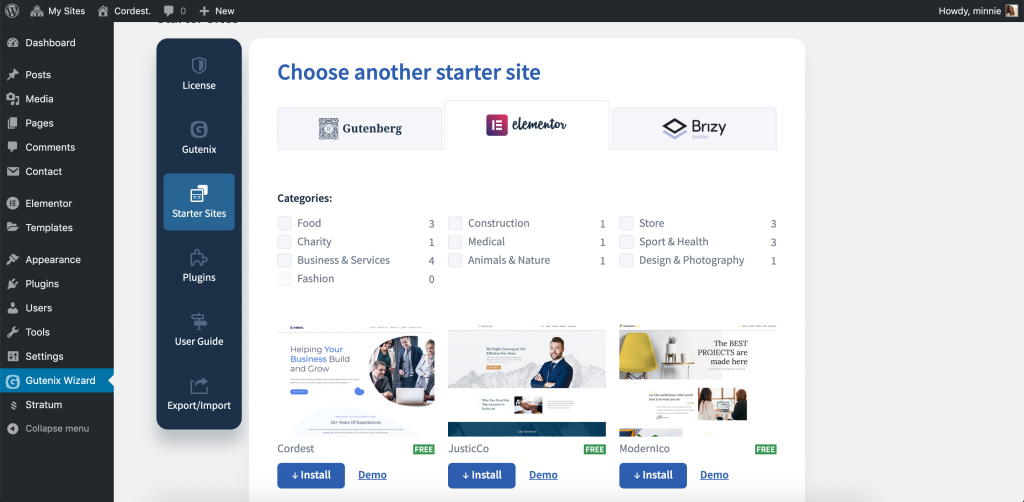
Select the desired complete website template and click Install. The next tab provides an automatic plugins installation interface. The Gutenix wizard helps you install all plugins required for this particular design, and gives suggestions on additionally-recommended plugins.
In our case, you will be required to install Elementor (obviously) and Contact Form 7 as an extra plugin:
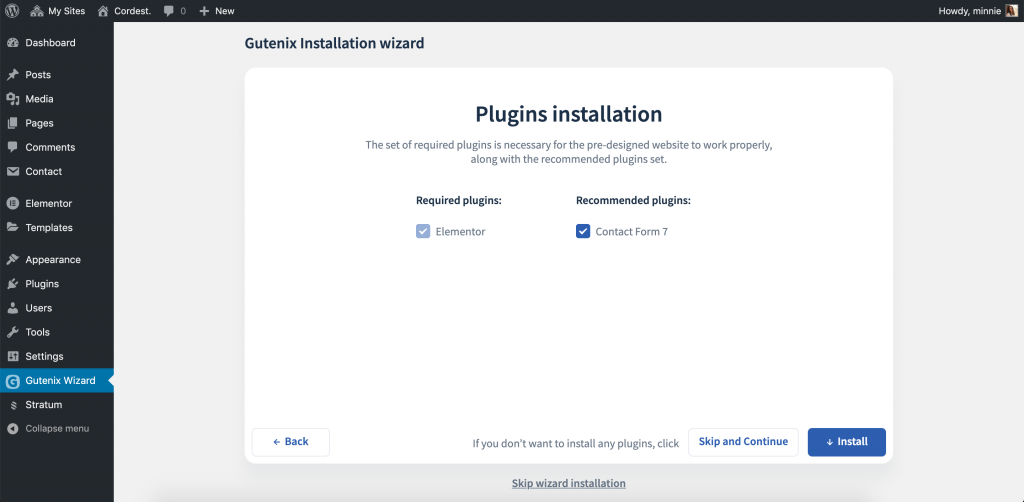
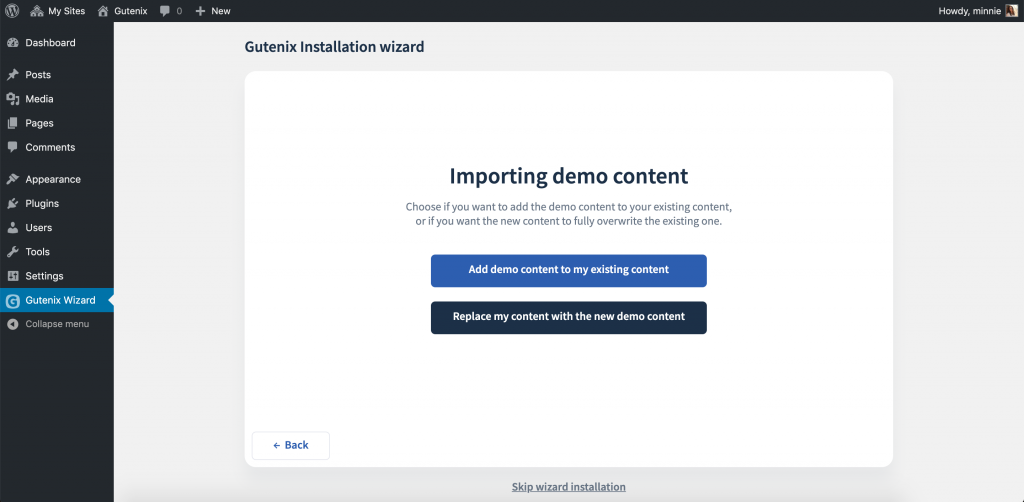
The next thing you need to decide upon is whether to add demo content to your existing content or replace your content with the new demo content:
The last step that takes a bit of a while is regenerating thumbnails:
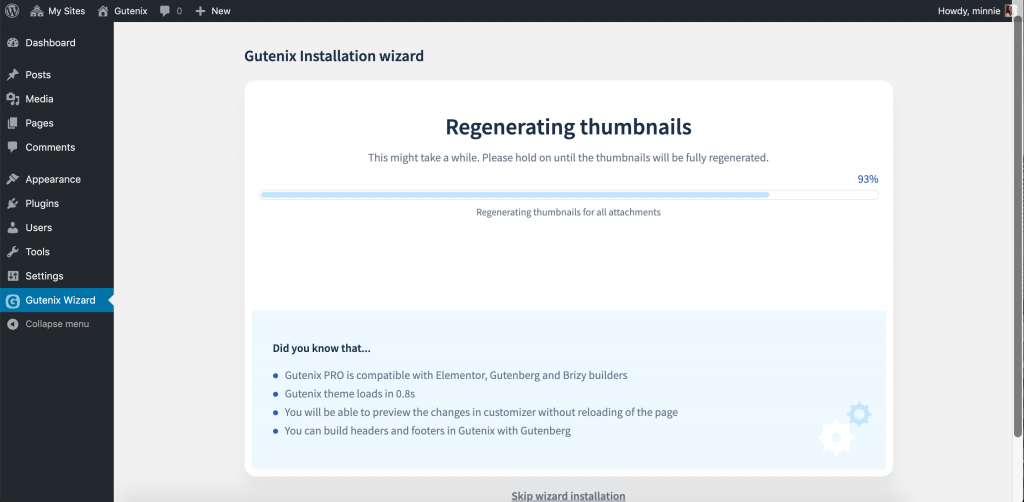
Congrats on installing the Gutenix theme! Seems like it’s a bit, but in reality, the entire process lasts no more than 10 minutes.
3.2 Editing Gutenix in Elementor
The truth is, even ready-to-go themes require a bit of editing. The other truth is, it’s the fastest way to create a good-looking website with Elementor.
For the following guide, I am using the Cordest starter site.
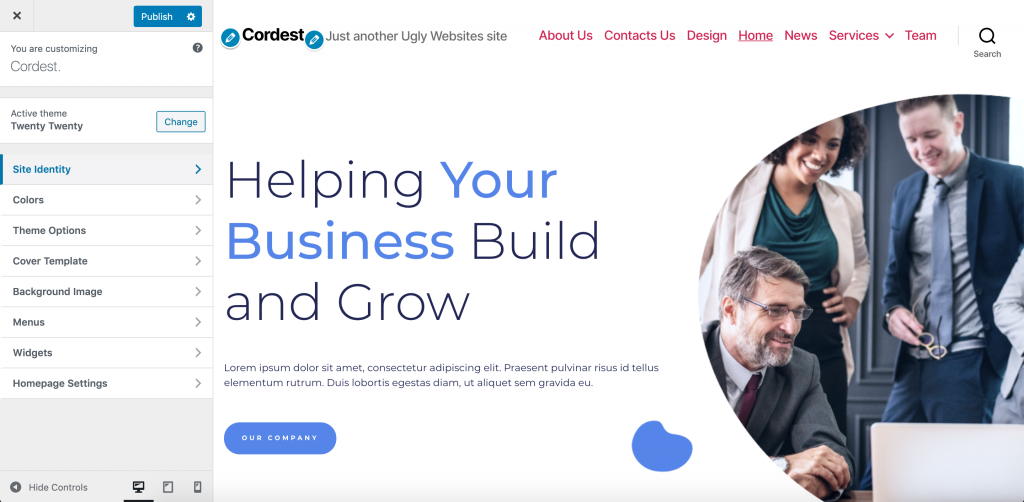
WordPress Customizer
Customizer is responsible for the general theme settings. You can use it for typography, navigation, widgets positioning, background images, and color settings.
Note down that most of the Customizer settings are also available in Elementor, so you can customize all of it conveniently in your favorite page builder (the “Site Settings” section).
However, Elementor does not provide such analog settings as Site identity, Background image, Menus, and more. For any changes in these sections, Customizer is obviously a great solution to use:
Elementor Page Builder
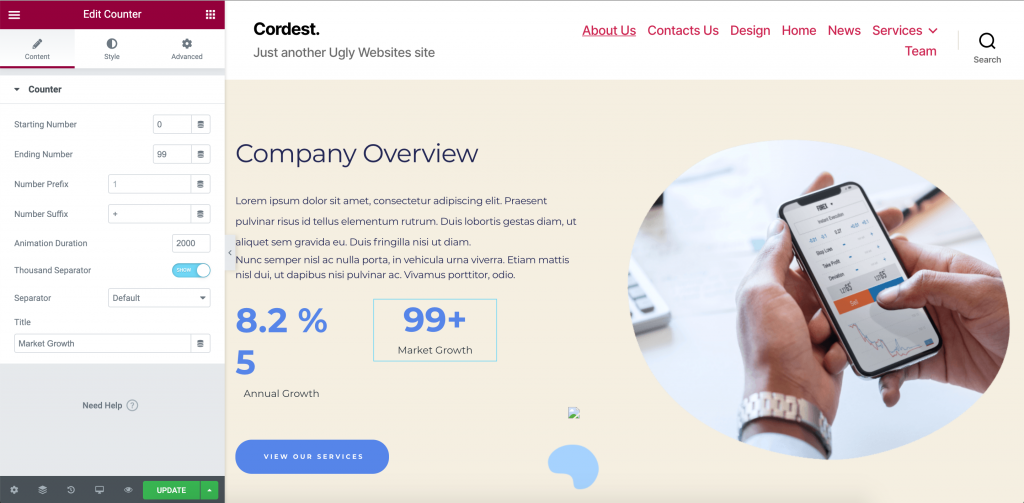
Go to your website and choose the Edit with the Elementor button.
You will see the panel with the various widgets that can be moved with the drag and drop functionality:
The list of free Elementor widgets is limited. However, you have at least 2 ways how to supplement your widget collection with advanced elements:
- Unlock the Elementor PRO ones by purchasing the premium subscription;
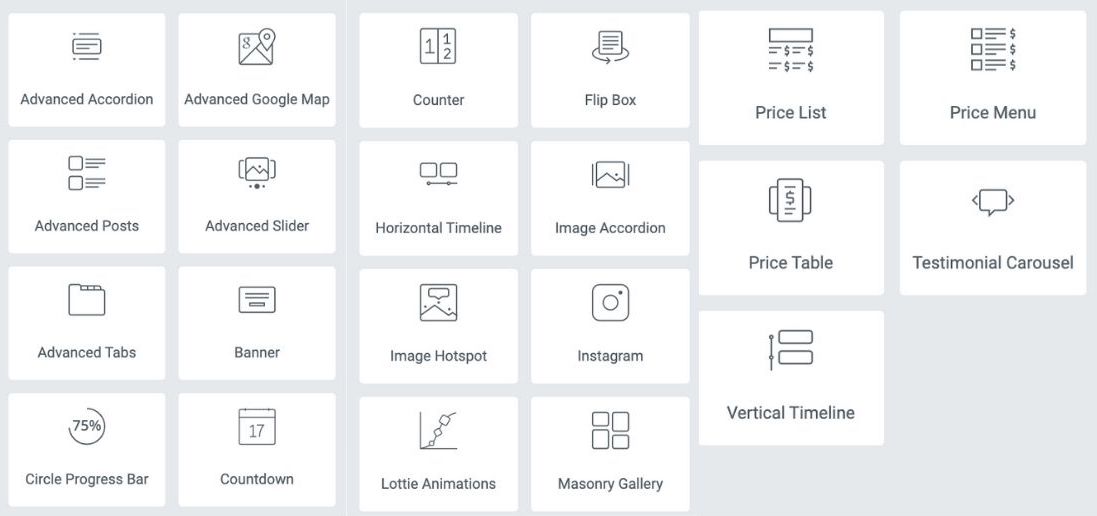
- Download a third-party addon with unique business-oriented widgets, such as Stratum for Elementor.
The list of Stratum 20+ advanced widgets:
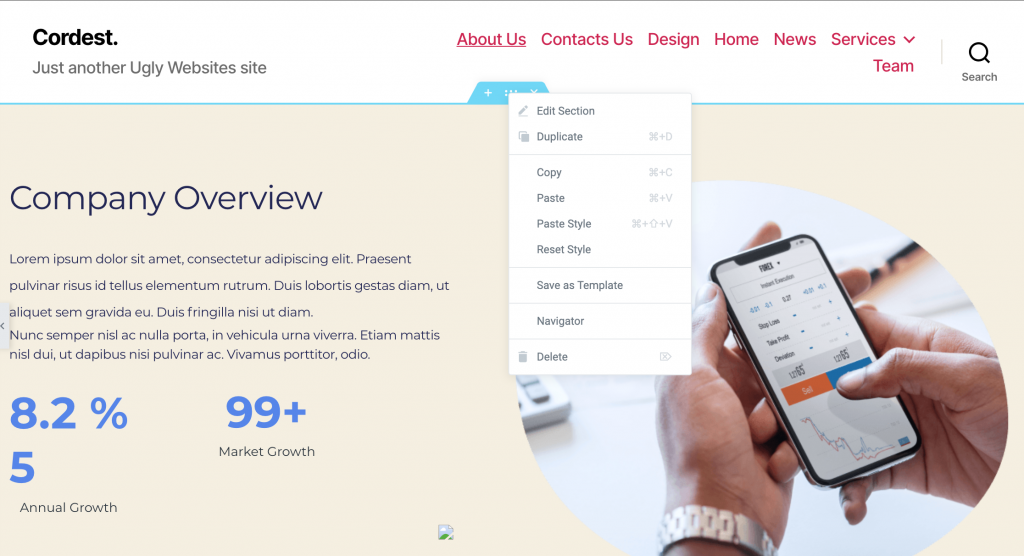
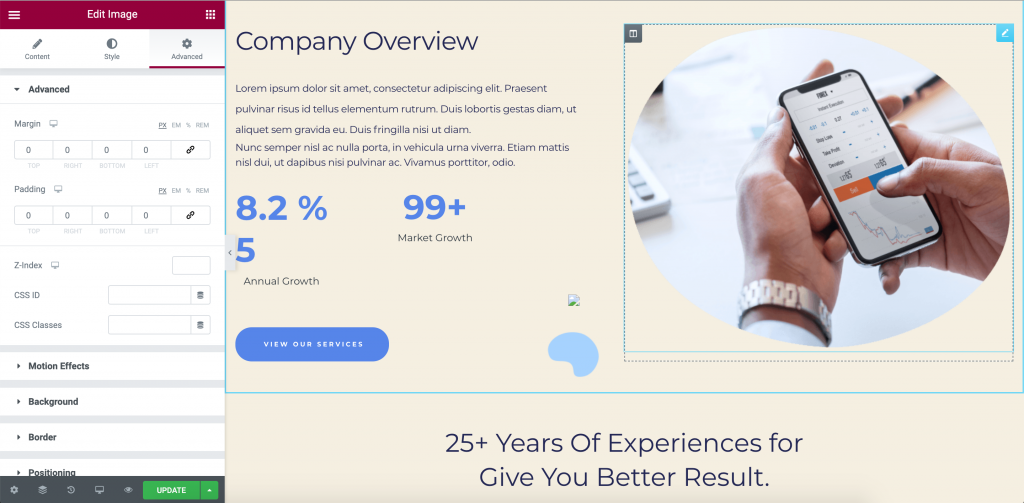
Edit the necessary section with the right button click and change the layout and style settings according to your needs:
Also, check the advanced settings that include more options with extensive functionality:
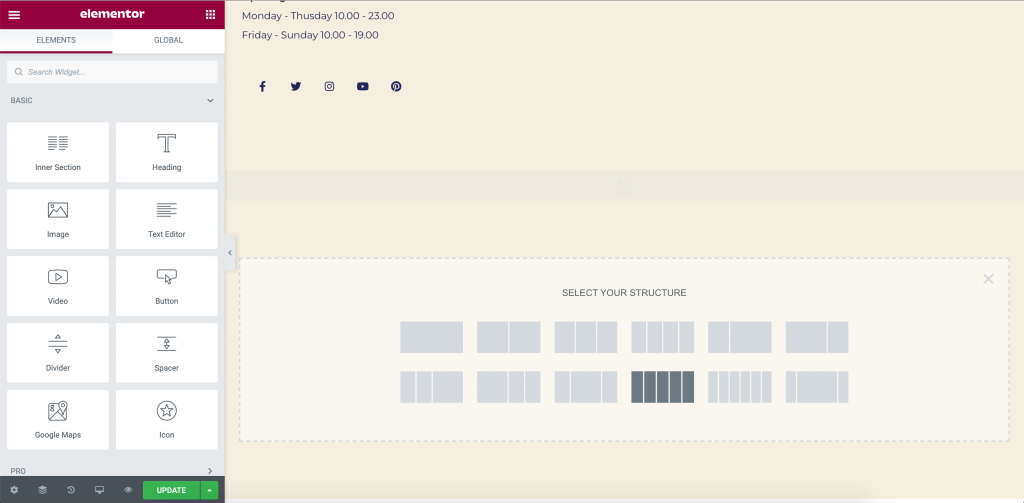
Find on the bottom of the page the Add New Section button or add the template. Then select the structure for a new section and start to fill it with the widgets:
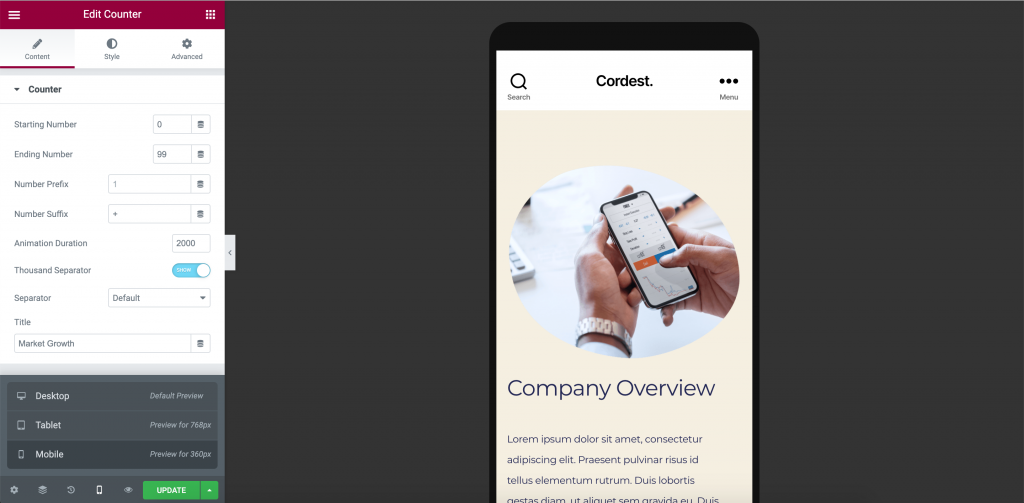
Customize the Gutenix template on the different types of screens:
Extra Plugins Suggestions
- Stratum Elementor Addons
- Akismet Anti-Spam
- Login LockDown
- WP-Optimize
- Cerber Security
- Yoast SEO
- Duplicator
- Clearfy Pro
Step 4. WORDPRESS SETTINGS
Last but not least, you need to tackle basic WordPress settings needed for the correct website display and indexing in search engines.
General Settings
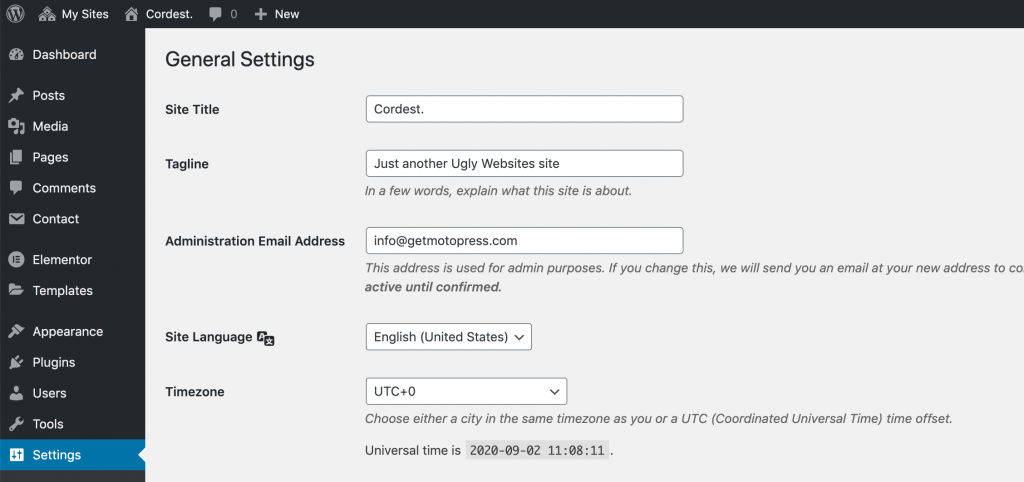
Go to the “Settings” section and select the “General” tab. Specify the time zone, which day will be the first in the website’s calendar, date format, and language. The selected site name will be displayed on the home page in the TITLE tag, and on other pages after the straight line.
Writing Settings
In this section, you only need to specify the main heading for your publications, which, by default, is set as “Uncategorized”. You can rename or replace the titles with other ones in the future.
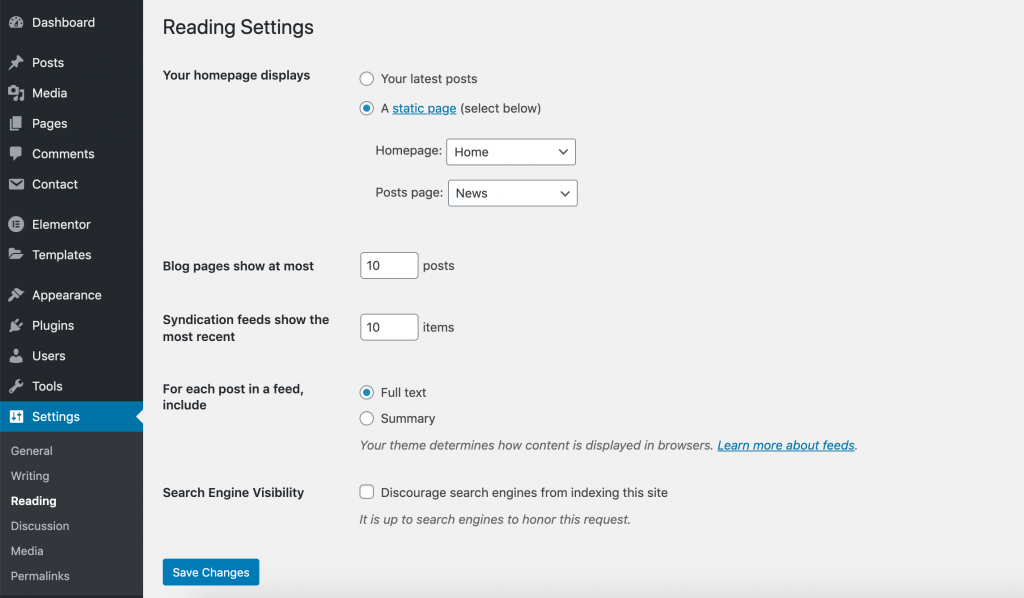
Reading Settings
Choose which of the two will be displayed on the main page: 1) the latest blog posts or 2) any other page. Gutenix themes have pre-built pages for all types of websites, so it will be set automatically.
In case you want to change and display posts on the homepage, configure the settings below. In particular, set the number of posts that will be displayed, and whether it’s going to be displayed as full text or summary:
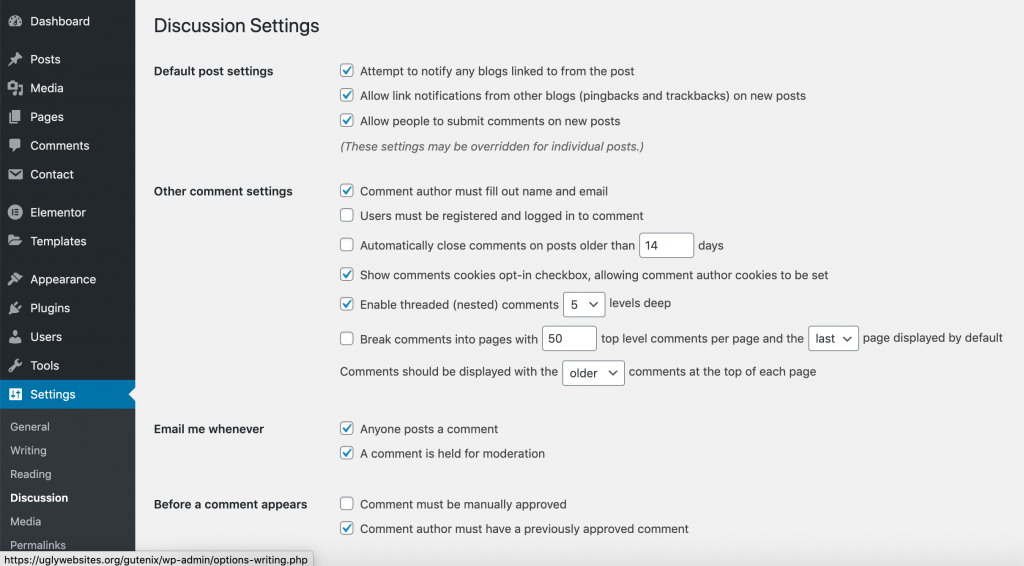
Discussion Settings
This section allows you to choose:
- in which way to display comments on your site;
- where to send notifications of new comments;
- which comments will be marked as spam, and which ones will be moderated;
- whether it is possible to reply to comments from other users (tree-like comments ) etc.
Overall, some users leave the default settings, and I think it’s okay.
Media Settings
You can leave out these settings by default.
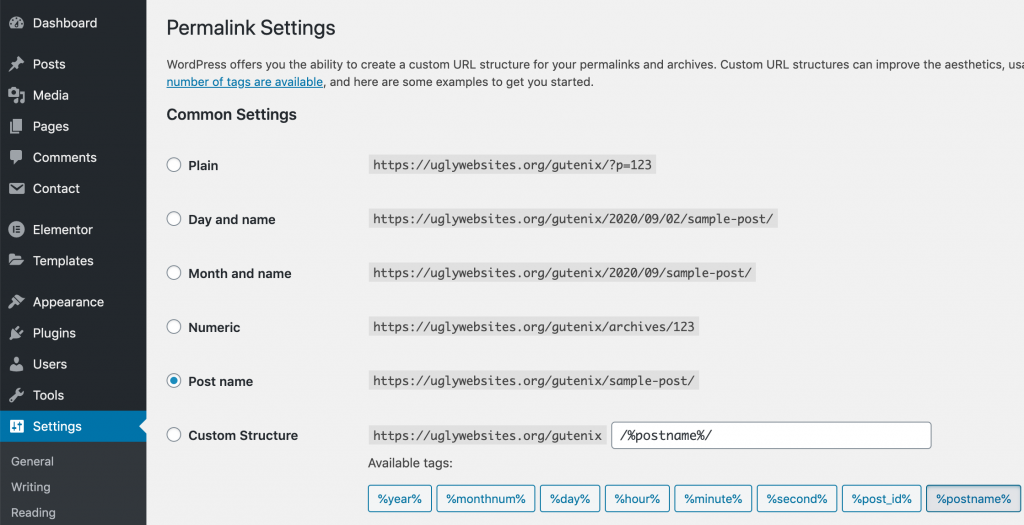
Permalink Settings
Choose how to form the URL of your future pages and posts. Should it be a conditional language or the link will contain the date and the title? Will the title be generated automatically or set manually?
What’s next?
It may indeed take you 1-2 hours to create a website with Elementor. (unless you go deep into customization and experiment with the Gutenix & Elementor potentials).
Completing the design and functionality is not a finish but rather a big start of your online journey.
Attracting target, website promo, social media marketing, building a solid (personal) brand – this job is never-ending!
To fulfill the purpose of your website (unless it’s a hobby with no particular goal), users spend an enormous number of resources to keep track of their statistics and examine visitors better.
Also, you’ve got to keep an eye on WordPress updates and keep track of any changes in themes and plugins. This helps to not only identify bugs in time but also implement new features and increase the website security & safety.
Finally…
Difficult to digest all those out-of-the-outline steps?
No problem, these are 10 major steps you MUST DO to create a fully-fledged website with Elementor & Gutenix theme entirely from scratch:
- The first thing you do is decide on the website type & idea & purpose. Choose a niche, formulate your goals, and determine the target audience.
- As soon as you have an exact idea of why you need a website, choose a domain name. Come up with a short, simple, and memorable domain name.
- Find a reliable hosting company to place your data on a server. Pay attention to different plans as they offer different services at a different cost. By the way, the hosting installation is included in the website starter bundle setup by MotoPress.
- Register a domain name. Many hosting providers include the domain name registration service in their plans. This option is the most convenient and least time-consuming.
- Install WordPress. Some hosting providers offer to install the software right through your personal account but you can always do it yourself!
- Upload the Gutenix theme. The majority of the themes are downloaded through the Appearance ➝ Themes tab of the WordPress admin panel. But if you choose to install Gutenix, you’ll need to do that through the Plugins tab. Upload the zip file and follow further instructions.
- Install extra plugins, in particular, Elementor page builder (unless it’s already there). Now you can choose a few other plugins to extend the website functionality, such as Stratum Elementor Widgets, Contact Form 7, and more.
- Alter one of the 15 Gutenix Elementor templates & fill the needed content. Elementor provides all the tools for amazing visual editing in real-time.
- Configure basic WordPress settings. Those are needed for correct website display and indexing in search engines.
- Congratulate yourself on the website launch. You managed to create a website with Elementor & Gutenix, and let’s admit – it wasn’t tough at all!
Good luck and may the power of Gutenix be with you!
