Looking for the best way to add a user-friendly WordPress booking calendar that supports recurring slots for your website?
Look no further, as in this post, we’ll take a close look at how you can use one of the affordable and reliable plugins, MotoPress Booking Calendar plugin, to offer bookings for repeatable events, tours, and workshops without having to repeat the process of adding each recurring event manually.
The short guide included with this post can help you get started quickly and create a real-time booking calendar in just a few steps.
What is WordPress Booking Calendar Plugin?
Before we explore the plugin’s possibilities in online bookings, let’s take a closer look at it first.
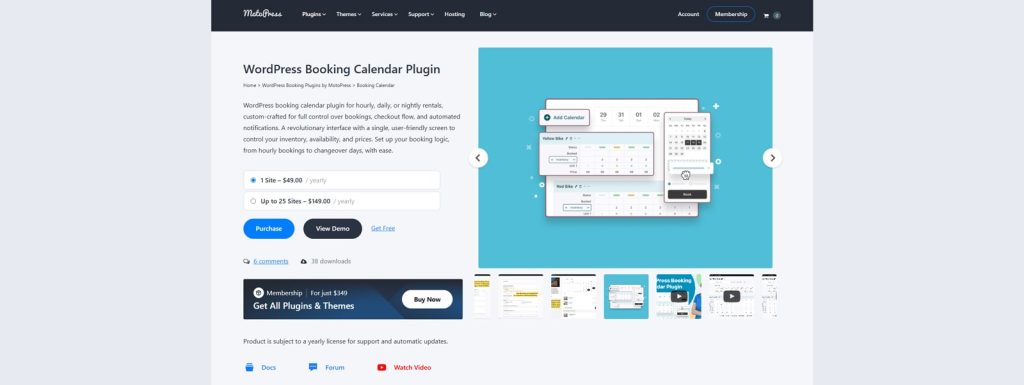
The Booking Calendar WordPress plugin is one of the latest solutions from MotoPress, the team behind popular solutions such as Appointment Booking, Hotel Booking, Stratum, Getwid, and Events Calendar.
Available in both premium and free versions, it delivers a wide set of features aimed at businesses that need booking management tools that are flexible and easy to use.
From managing the inventory of your classes, tours, events, and other types of bookable items to creating booking forms in a few simple steps, this booking calendar provides everything your websites may need, limiting only a few top features behind a premium version of the plugin.
Key features:
- Visual calendar with 3 booking modes;
- Integrated inventory and availability manager;
- Drag-and-drop booking form builder;
- Dynamic pricing support;
- Easy calendar integration through Gutenberg and shortcodes.
| Name | Developer | Price | Installations |
|---|---|---|---|
| Booking Calendar | MotoPress | Free or from $49/year | 200+ |
How to Add WordPress Booking Calendar with Recurring Slots
Now that we know a little more about MotoPress booking Calendar for WordPress, let’s explore how to configure it to showcase repeatable classes, events, and tours. Thanks to the integrated visual calendar and inventory manager, adding recurring timeslots tied to your services and bookable items is quite simple.
The WordPress Booking Calendar supports multiple booking modes, ranging from nightly to hourly and daily ones. In this guide, we’ll explore the hourly mode as it allows you to create timeslots that can be set as repeatable throughout an extensive range. Below, we’ll explore how to:
- Create a calendar
- Edit tour or class availability
- Customize timeslots
- Add booking forms and notifications
- Integrate the calendar into your website.
Step 1. Create a Calendar
If you have already downloaded, installed, and activated the WordPress calendar booking plugin, you can get started with it by creating a calendar for your classes first. The process is quite straightforward and only requires you to perform a couple of simple actions:
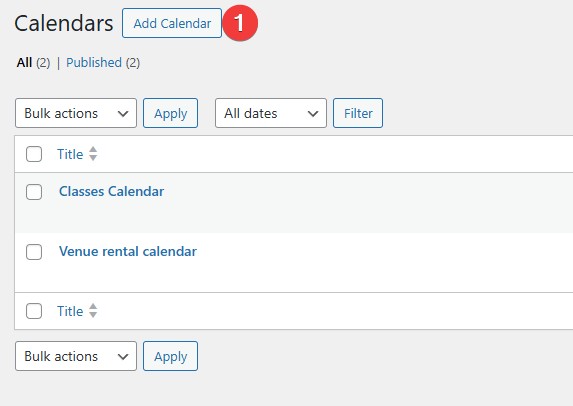
1. In your site’s dashboard, navigate to the “Calendars” tab. Press the “Add Calendar” button to add a new calendar.
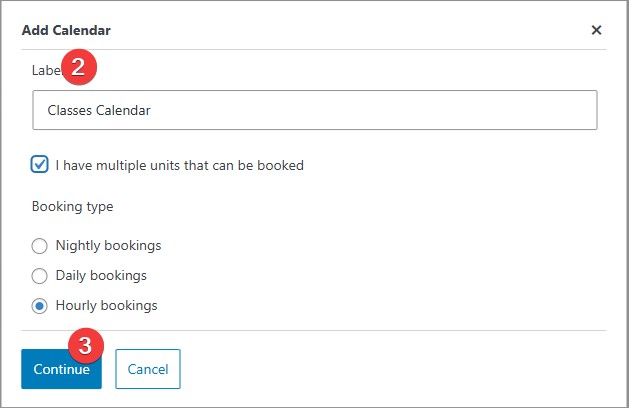
2. In the opened modal window, specify the calendar name in the “Label” field. Here you can also select if you want your multiple units to be booked at once, and choose one of 3 booking modes:
- Nightly (best for accommodations and vacation rentals);
- Daily (perfect for car rentals);
- Hourly (great for online classes, venue rentals, and anything that requires repeatable timeslots).
3. Choose the Hourly mode of WordPress Booking Calendar if you plan to add recurring rentals or educational classes, and press the “Continue” button to create a calendar.
Step 2. Add Bookable Items
After creating the calendar, you’ll need to populate it and the integrated inventory manager with items you want to rent out or classes and studio workshops you want to offer regularly.
This is also done in a few simple steps and doesn’t require you to add or develop anything manually. Follow these instructions to add bookable items with the Booking Calendar for WordPress:
1. When you open your newly created calendar, find the Inventory section under the Variation block. Press the plus button next to the “Inventory” title.
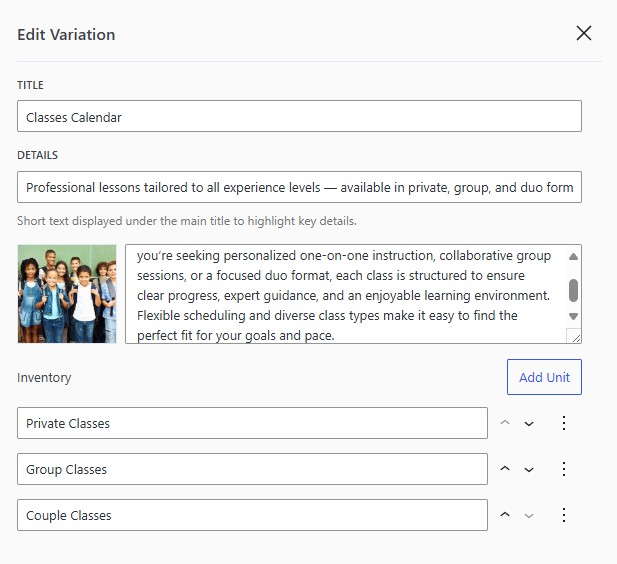
2. An inventory management sidebar will open. It allows you to add classes, photography sessions, video shoots, and nearly anything you may want to offer on an hourly basis through WordPress Booking Calendar. In this sidebar, you need to provide:
- Title of the bookable item variation, for example, “Private classes”;
- Image and description for the variation as you want it to be displayed in the calendar during booking;
- An amount of units (classes, workshops, counseling, etc) that you want to be available for booking.
3. After making all necessary changes, press the “Save” button to add them to your calendar.
Step 3. Add Timeslots
The next step is directly connected with specifying timeslots. It is key to managing availability and prices later, for example if you need to configure repeatable workouts for your gym.
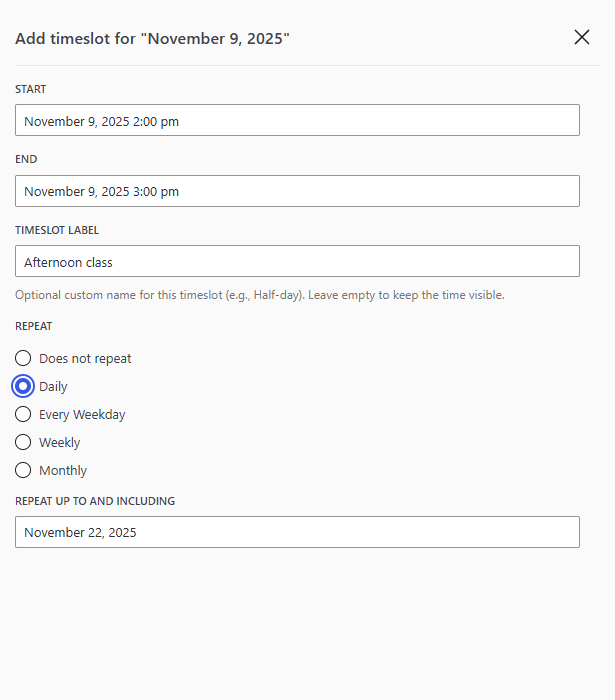
Here you can set up recurring timeslots to enable bookings that repeat throughout a certain timeframe. To add timeslots, do the following:
1. In the Calendar page in your site’s dashboard, find the date you need to add a repeatable timeslot to and press the plus button next to it.
2. A sidebar will appear where you can specify details of a timeslot. First, add start and end dates, creating a timeframe in which you want the timeslot to appear.
3. Next, set the repeat options by choosing one of the following:
- Does not repeat;
- Daily;
- Every weekday;
- Weekly;
- Monthly.
4. Press the Save button to save any changes made in the WordPress Booking Calendar. You’ll see the calendar layout change as it will show the added timeslot according to your settings.
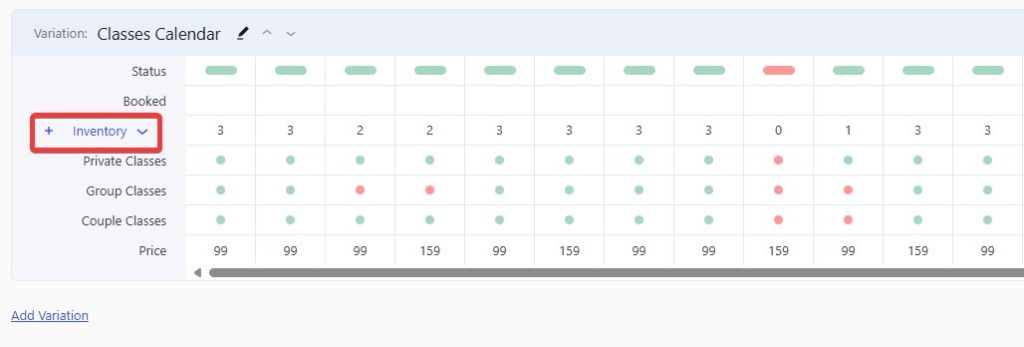
Step 4. Specify Availability and Prices
After bookable items and timeslots are added, it’s time to set availability and add prices for the bookable units. Unlike many other plugins within the same pricing range, this plugin provides an easy and smooth way of editing your availability and prices. Here’s how it is done:
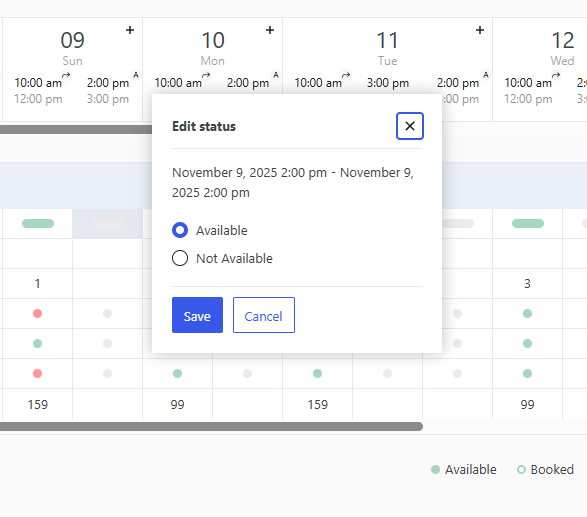
1. On the Calendar page, find the timeslot you want to edit availability and prices for.
2. Press a gray rectangle in the “Status” cell to make all items under this timeslot available or not available in a pop-up that appears.
3. Alternatively, you can press gray dots across from single bookable items to mark these items as available or not available.
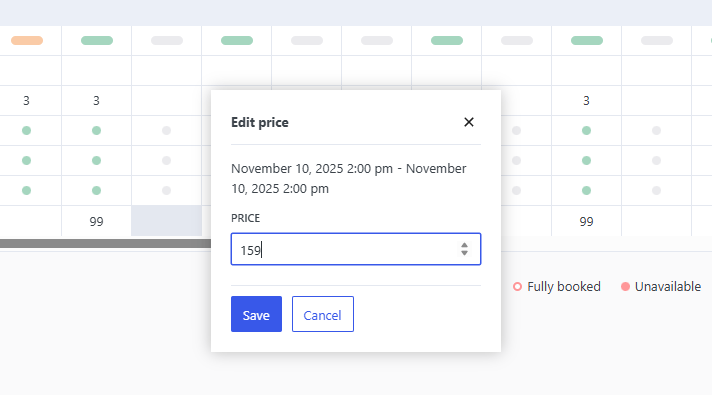
4. To set rental or booking rates, press the empty cell across the necessary timeslot and the “Price” row. A pop-up that appears after that will allow you to put the rate for an exact timeslot in WordPress Booking Calendar. Note that you can’t set the price for each bookable item, only for a timeslot. Price can vary from one timeslot to another, depending on your schedule, load, or other circumstances.
5. To save availability and price settings, press the “Save” button in the pop-up windows that appear during this stage.
6. If you have a lot of timeslots and items, such as photoshoots, classes, or workshops that you need to update, feel free to use the Bulk Edit feature. It is accessible via the link on the top right of the variation interface.
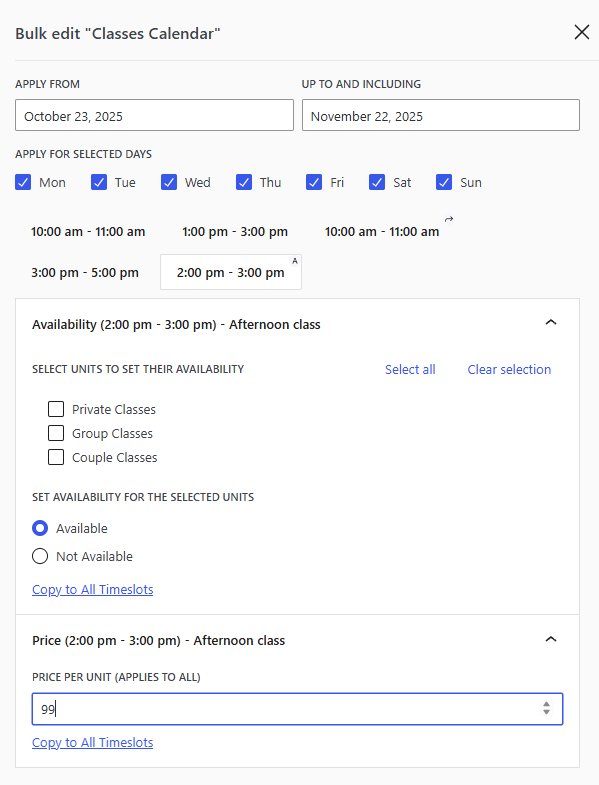
7. After pressing “Bulk Edit”, a sidebar will appear where you can edit the following:
- Availability and price per unit for any of the created timeslots;
- Units to which new settings apply;
- Copy availability and price settings to all timeslots;
- Apply new changes for all or just selected days;
- Specify the timeframe for the new changes.
8. Press the “Save” button to ensure your new availability and price data are saved correctly.
Step 5. Add a Booking Form & Notifications
To make your customers’ experience smooth when booking recurring classes and events in the WordPress Booking Calendar, you’ll need to configure a booking form and notifications for your calendar. This will help you to get all the necessary customer data and avoid no-shows. Here’s how to do it:
1. On the Calendar page, press “Add New Form” in the upper right corner.
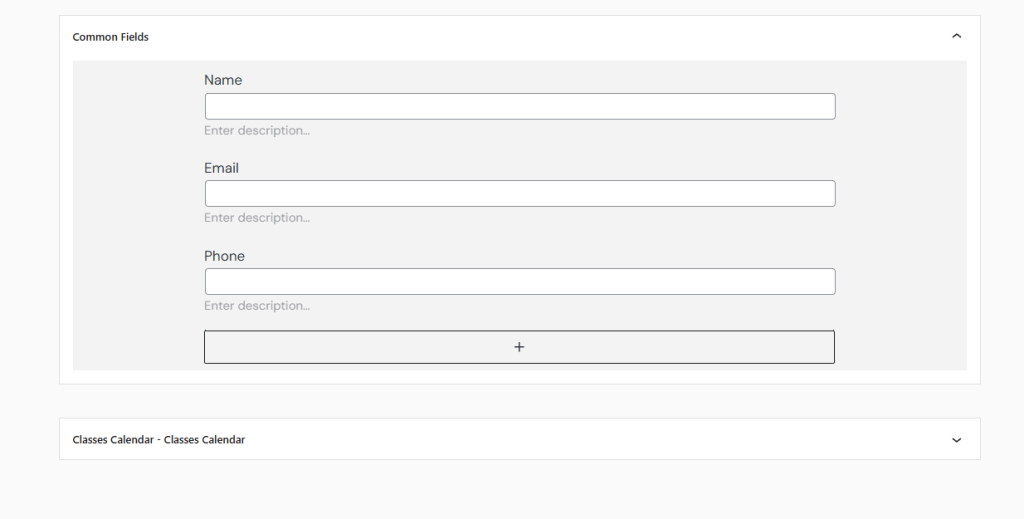
2. The “Forms” tab will open, where, using the included drag-and-drop form builder, you’ll be able to create a booking form for your calendar to later integrate it into your WordPress theme.
3. By default, there are 3 basic fields in the default form of the WordPress calendar booking plugin – Name, Email, and Phone. They allow you to gather basic data about your customer. However, the plugin also provides other fields, for example:
- Number;
- Checkbox;
- Short/Long answer;
- Multiple Choice;
- Dropdown and others.
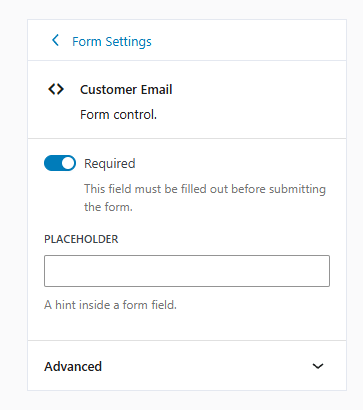
4. Using the sidebar on the right of the page, you can customize each field after selecting it in the builder (for example, you can make the field required and edit the placeholder).
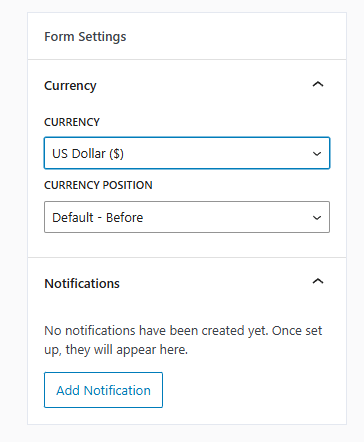
5. The same sidebar can be used for changing form settings, such as currency type and position.
6. To configure an email notification, press the “Add Notification” button in the sidebar. You’ll be taken to the Notifications tab, where you can create an email reminder, configure its trigger, recipients, email template, and specify other settings.
Step 6. Add the Calendar to Your Website
One last step towards displaying the WordPress Booking Calendar plugin on your website is to integrate it on a page using the Gutenberg editor. This is possible due to the supplied booking calendar block that you can use to display the calendar itself and the connected form. Here’s how to achieve it:
1. Open the “Pages” tab in your site’s dashboard.
2. Press the “Add Page” button located at the top of the page.
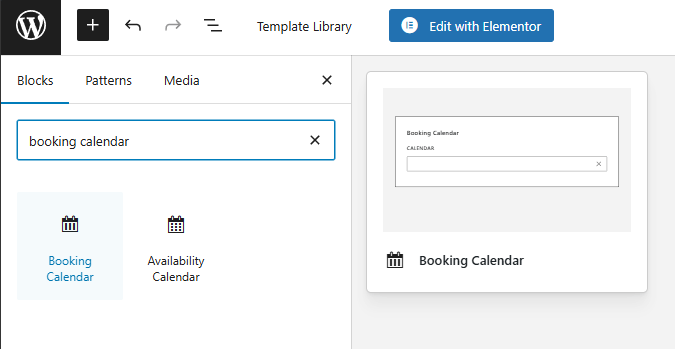
3. In the Gutenberg editor interface, click the blue plus (+) button in the top-left corner and type “booking calendar” in the search bar to find the necessary calendar block.
4. Select the block from the results by clicking on it once or dragging it onto your page, where your booking calendar will be shown.
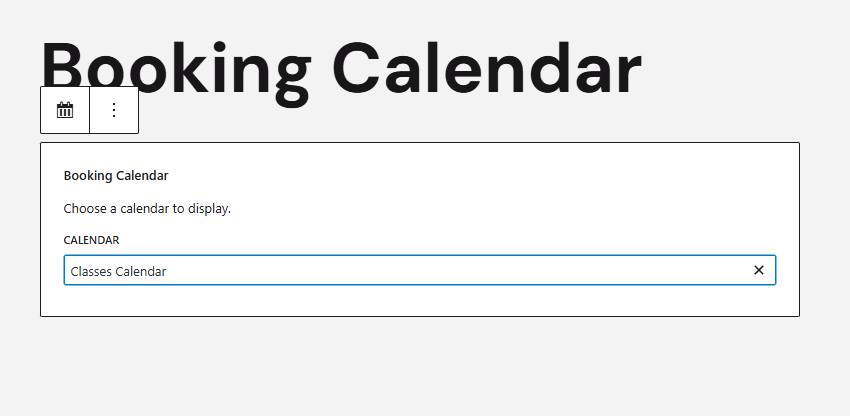
5. Next, choose the calendar you want to display in the “Calendar” dropdown menu.
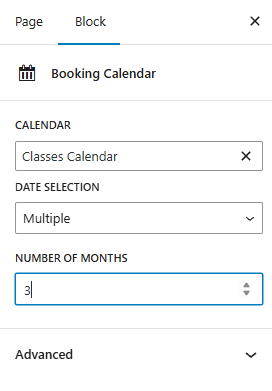
6. Feel free to edit any settings in the sidebar on the right. For example, here you can choose:
- Active calendar;
- Date selection mode (Auto, Range, Multiple, Single);
- Number of months to display.
7. When you’re done with editing, click “Save draft” to save your changes. Alternatively, you can press “Publish” to make the calendar visible on your live site.
Showcase your Events with MotoPress Events Calendar

As you see, the MotoPress Booking Calendar plugin is quite flexible when it comes to adding booking functionality through a visual calendar on any WordPress website. But what if you need to simply showcase upcoming events and add booking functionality later? For this task, we recommend using Events Calendar by MotoPress – a reasonably priced plugin that offers essentials like an easy-to-edit event calendar, Gutenberg block support, color coding, and support of recurring events. It also allows you to create dedicated pages for your scheduled events, where you can add event descriptions. Alternatively, you can use this feature to combine it with the WordPress Booking Calendar plugin and add a booking form and visual calendar to introduce event booking capabilities.
Key features:
- Visual events calendar builder;
- Support of unlimited calendars;
- Easy import and export of ICS calendar files;
- Best choice for any repeatable or multi-day event;
- Integrated Gutenberg block and shortcode.
| Name | Developer | Price | Installations |
|---|---|---|---|
| Events Calendar | MotoPress | From $39/year | 120+ |
Conclusion
We hope this overview of the WordPress Booking Calendar with recurring timeslots has helped you understand how to create a calendar that will enhance your website. Whether you need something simple for online booking or a more complex approach to use it as a WordPress tour booking plugin, this tool can certainly help you achieve it. Aside from being easy to use, solutions like the ones presented in this article can also assist you with:
- Recurring bookings: By using calendar WordPress plugins, you help your site visitors to schedule classes and tours automatically. This saves time for both you and your customers.
- Automated notifications: By utilizing the automation of email reminders, you can not just keep clients informed of upcoming events, meetings, and workshops, but also avoid no-shows and ensure the best outcome for your business.
- Customizable scheduling: Thanks to configurable timeslots, plugins like Booking Calendar WordPress allow you to adjust service and staff availability to meet your needs, while also providing flexibility.
- Improved user experience: Finally, with modern booking calendar plugins, you can deliver a professional booking process. This not only automates routine business processes but also makes it enjoyable for clients to schedule recurring events & classes and services.